If your sump pump will not shut off, check the float, discharge line, check valve, basin water level, and pump sizing before replacing the unit. Here is a safe troubleshooting order.
What do you need help with?
Open an answer, or tell us what we should cover next.
Answered in this guide
Diagnose why a sump pump keeps running
Follow a safe troubleshooting order: turn off power, check water entry, inspect the control, discharge system, check valve, basin, pump size, and electrical supply to find why the pump will not shut off.
Check whether the sump pump float or sensor is stuck
With power disconnected, inspect whether the float moves freely or the electronic sensor responds correctly. A stuck, obstructed, damaged, or incompatible control can keep the pump running continuously.
Check whether water returns to the basin after the pump stops. A backward, stuck, leaking, or missing check valve can refill the pit and cause the pump to restart repeatedly.
Check whether the sump pump discharge line is restricted
Inspect the discharge pipe, visible joints, and setup for blockages, restrictions, leaks, or incorrect installation that reduce flow and prevent the basin from emptying efficiently.
Requests help us prioritize the next guide. No email required.
One anonymous request per topic.
Sump pump running constantly
A sump pump may run continuously during heavy rain or groundwater saturation, but it should normally shut off after lowering the water in the basin. If it keeps running when the basin is nearly empty, never catches up, or runs even when the water level is low, the likely causes include a stuck float, restricted discharge, a leaking check valve, incorrect installation, or a pump that cannot handle the inflow.
Turn off power before inspecting the pump
Keep hands and tools away from the water and pump until the unit is unplugged or disconnected from power. If the sump pit contains sewage, contaminated water, or damaged electrical equipment, do not work in it yourself. Follow the pump manufacturer’s instructions, and have an electrician or plumber handle unsafe wiring, damaged outlets, or flooded electrical connections.
Do not unplug the pump during an active storm unless you are inspecting it briefly and have another way to control rising water. A high-water alarm or backup pump can reduce the risk of basement flooding while you troubleshoot.
1. Check whether the water is actually entering the basin
During sustained rain, snowmelt, or a high groundwater event, constant operation may be normal. Watch the water level for several minutes:
If the water level keeps rising while the pump runs, the inflow may exceed the pump’s capacity.
If the pump lowers the water but the level rises again quickly, the drainage system may be receiving a large amount of water.
If the basin is nearly empty but the pump continues to run, focus on the float, switch, discharge line, and check valve.
Make sure downspouts and surface drainage are directed away from the foundation where possible. A pump cannot compensate indefinitely for a damaged foundation drain, a broken discharge line, or unusually high groundwater.
Product prices and availability are accurate as of the date/time indicated and are subject to change. Any price and availability information displayed on Amazon.com at the time of purchase will apply to the purchase of this product.
2. Inspect the float or electronic water-level sensor
A mechanical float can catch on the pump, basin wall, discharge pipe, or power cord. A tethered float may also become tangled or fail to drop far enough to turn the pump off. With the power disconnected, check that the float moves freely through its full range.
Look for:
A cord trapped beneath the float
A float rubbing against the basin or piping
Mud or debris restricting movement
A float that is waterlogged, cracked, or stuck
A switch that remains on even when the float is down
Some pumps use a vertical float, pressure sensor, or electronic control instead of a tethered float. Do not force the switch or bypass it. Replace a failed float or switch with a part compatible with the specific pump and control system.
Product prices and availability are accurate as of the date/time indicated and are subject to change. Any price and availability information displayed on Amazon.com at the time of purchase will apply to the purchase of this product.
3. Check the discharge pipe for a blockage or restriction
A blocked or restricted discharge line can make the pump run continuously while moving little water. Inspect the section of pipe you can safely reach, including the outlet where water leaves the building.
Check for:
Ice at the outdoor outlet
Soil, mulch, leaves, or animal nests blocking the pipe
A crushed or sharply bent section of hose or pipe
A closed or partially closed valve
A discharge outlet that is buried or submerged
A frozen section in cold weather
Never look into a pressurized discharge line while the pump is operating. Clear outdoor obstructions only when it is safe, and keep the discharge directed away from the foundation. If the line is frozen inside or inaccessible, a plumber may need to repair or reroute it.
Product prices and availability are accurate as of the date/time indicated and are subject to change. Any price and availability information displayed on Amazon.com at the time of purchase will apply to the purchase of this product.
4. Test the check valve for backflow
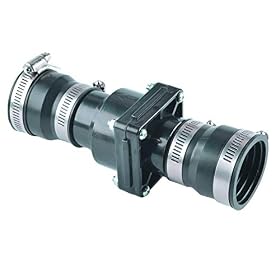
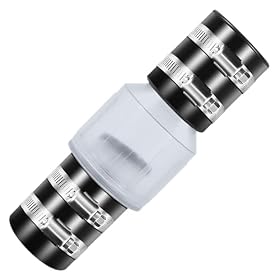
The check valve is intended to keep water in the discharge pipe from flowing back into the basin after the pump stops. If it is installed backward, stuck open, leaking, or missing, water can return to the pit and cause repeated cycling or constant operation.
A simple indication of backflow is a sudden rush of water back into the basin immediately after the pump shuts off. Some backflow is expected from water remaining in the pipe, but a large return can make the pump repeatedly lift the same water.
Confirm that the valve’s flow-direction arrow points away from the pump. Replace a valve that does not close properly with one sized and rated for the pump’s discharge piping. Follow the pump and valve manufacturer’s installation requirements rather than relying only on the pipe diameter.
Product prices and availability are accurate as of the date/time indicated and are subject to change. Any price and availability information displayed on Amazon.com at the time of purchase will apply to the purchase of this product.
5. Look for leaks and incorrect setup
A leak in the discharge system can keep the basin from emptying efficiently. With power disconnected, inspect visible joints, adapters, and flexible hose for splits, loose clamps, or water marks. A discharge connection that leaks inside the pit may return water directly to the basin.
Also check for installation problems such as:
A pump sitting on sediment instead of a stable, level base
A discharge pipe that does not extend far enough outside the building
A pipe outlet positioned where water flows back toward the foundation
A pump that is too close to the basin wall for its float to operate
A missing or poorly fitted basin cover allowing debris into the pit
Do not seal the basin in a way that blocks required venting or interferes with the pump’s operation. Use only fittings and pipe arrangements approved or recommended for the pump.
6. Check the basin and pump intake for debris
Unplug the pump before lifting or inspecting it. Remove loose debris from around the pump intake, but do not disassemble the motor housing unless the manufacturer permits it. Gravel, sediment, plastic, and other debris can restrict the intake or damage the impeller.
If the basin is too shallow, too narrow, or incorrectly positioned for the pump’s switch, the pump may cycle incorrectly. The pump should sit upright and stable, with enough room for the float or sensor to move freely.
A sealed or covered basin may also collect water from several foundation drains. If the pump is correctly installed but the inflow is consistently greater than its output, the problem may require drainage work or a higher-capacity system rather than a switch adjustment.
7. Confirm the pump is appropriately sized
A pump’s advertised flow is not the same as the flow it delivers through a real discharge system. Vertical lift, pipe length, fittings, check valves, and restrictions reduce output. The pump must be matched to the total height from the pump to the discharge outlet and the piping arrangement.
When replacing a pump, compare:
Required vertical lift
Discharge pipe size and connection type
Expected inflow during heavy weather
Float or sensor clearance in the basin
Electrical voltage and circuit requirements
Continuous-duty suitability and manufacturer limitations
A larger pump is not automatically the right solution. An oversized pump may cycle more frequently if the basin is small or the switch has a narrow operating range. If the current pump cannot lower the water during normal conditions, have a plumber evaluate the inflow, discharge layout, and pump capacity together.
8. Check the electrical supply last
If the pump runs but performs poorly, the cause is usually hydraulic or mechanical rather than electrical. Still, a loose plug, damaged cord, tripped breaker, or failing control can cause abnormal operation. Do not use an extension cord unless the manufacturer specifically allows it; many sump pump installations require a properly grounded, dedicated circuit.
Stop using the pump and arrange professional service if you notice:
A hot, damaged, or melted plug or receptacle
Burning smells, smoke, sparks, or repeated breaker trips
A damaged power cord
Water near unsafe electrical connections
A motor that hums, overheats, or shuts down repeatedly
Do not bypass the float switch, ground connection, breaker, or other safety device.
When to replace the pump or a part
Replace the float or switch when it is damaged, stuck, or incompatible with the pump and cannot be repaired according to the manufacturer’s instructions. Replace a check valve when it leaks or fails to close after cleaning and correct installation.
A replacement pump is reasonable when the motor is noisy or overheating, the impeller or housing is damaged, the pump cannot meet the required lift, or the unit repeatedly fails after the discharge and switching problems are corrected. Choose a compatible pump based on lift, inflow, pipe size, basin clearance, and electrical requirements—not only the advertised gallons-per-minute figure.
If the primary pump is essential to protecting a finished basement or the property is vulnerable during outages, consider a backup pump or backup power system. A backup should be sized for the basin and discharge setup and maintained separately from the primary pump.
Quick troubleshooting order
Determine whether heavy rain or groundwater is causing unusually high inflow.
Disconnect power and make sure the float or water-level sensor moves freely.
Inspect the discharge outlet and pipe for blockage, freezing, crushing, or sharp bends.
Check the check valve for correct direction and backflow.
Inspect visible joints, hose, basin, pump position, and intake for leaks or debris.
Confirm the pump’s lift, pipe size, basin clearance, and capacity are suitable.
Address electrical or motor problems only with appropriate professional help.
If the water level is rising and the pump cannot keep up, treat it as an active flooding risk. Use a backup pump if available, remove valuables from the area, and contact a plumber or qualified pump installer promptly.
FAQ
Is it normal for a sump pump to run constantly during rain?
It can be normal during heavy or prolonged rain if water is continuously entering the basin and the pump is lowering the level. If the basin stays nearly empty while the pump runs, or the pump cannot lower the water, inspect the float, discharge line, check valve, and pump capacity.
Why does my sump pump keep running after the pit is empty?
The float or electronic sensor may be stuck, tangled, or positioned incorrectly. A faulty switch, incorrect basin setup, or control problem can also keep the pump on. Disconnect power before inspecting it, and replace the switch only with a compatible part.
Can a bad check valve make a sump pump run constantly?
Yes. A leaking or incorrectly installed check valve can allow water in the discharge pipe to flow back into the basin. That backflow may cause repeated cycling or prevent the pump from keeping the water level down.
Should I replace a sump pump that runs all the time?
Not immediately. First rule out a stuck float, blocked discharge, leaking check valve, discharge leaks, excessive inflow, and incorrect sizing. Replace the pump when its motor or impeller is damaged, it overheats, or it cannot handle the required lift and inflow after the system is corrected.