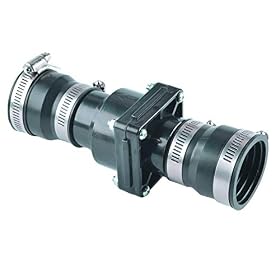
The correct sump pump discharge pipe is usually the same diameter as the pump outlet. Learn when 1-1/4-inch or 1-1/2-inch pipe is appropriate, why reducing the size can hurt performance, and how to plan the discharge route.
What size discharge pipe for a sump pump
Use a discharge pipe that matches your sump pump’s outlet diameter, unless the manufacturer specifies otherwise. Many residential sump pumps use a 1-1/4-inch or 1-1/2-inch outlet, but the pump’s instructions and molded outlet size should decide. Avoid reducing the pipe diameter immediately after the pump because a smaller line can restrict flow and increase the pump’s workload.
How to choose the discharge pipe size
Start with the pump outlet
Check the threaded or slip connection at the pump. The discharge pipe, adapter, check valve, and other fittings should be compatible with that outlet size.
Common residential pump connections include:
1-1/4-inch pipe: Found on some smaller sump pumps.
1-1/2-inch pipe: Common on many primary sump pumps and higher-capacity models.
Larger pipe: Used when required by the pump manufacturer, the plumbing design, or a high-flow application.
Do not choose pipe size based only on the pump’s horsepower. Two pumps with similar horsepower can have different outlet sizes and flow characteristics. Confirm the required pipe diameter in the installation manual.
Do not reduce the pipe without a specific reason
A reducer may be necessary to connect to an existing discharge line, but it can limit flow. The restriction becomes more significant when the discharge route is long, has substantial vertical lift, or includes several elbows.
If you need to connect a smaller existing line to a larger pump outlet, check the pump manufacturer’s requirements first. Replacing the undersized section is generally preferable to making the entire discharge line smaller.
The pump must overcome resistance from the pipe, fittings, vertical height, and the point where water exits. A pipe that is too small or heavily restricted can cause:
Lower discharge flow
Longer pump run times
More frequent cycling during heavy rain
Greater noise or vibration
Increased risk that the basin fills faster than the pump can empty it
A larger pipe is not automatically better in every installation. The pump must be designed to move water efficiently through it, and the connection still needs to match the manufacturer’s specifications. The goal is a properly sized, reasonably smooth discharge route with as few unnecessary restrictions as possible.
Product prices and availability are accurate as of the date/time indicated and are subject to change. Any price and availability information displayed on Amazon.com at the time of purchase will apply to the purchase of this product.
What size check valve should you use?
Choose a check valve that matches the pump outlet and discharge pipe diameter. For example, a pump designed for a 1-1/2-inch discharge normally needs a compatible 1-1/2-inch check valve, not a smaller valve installed as a quick substitute.
The check valve prevents water in the vertical discharge pipe from flowing back into the basin when the pump shuts off. Without one, the pump may restart more often because it has to lift the same water repeatedly.
Install the valve according to its flow-direction arrow. Some valves are designed for vertical installation, horizontal installation, or either orientation. Follow the valve instructions rather than assuming every model can be positioned the same way.
Product prices and availability are accurate as of the date/time indicated and are subject to change. Any price and availability information displayed on Amazon.com at the time of purchase will apply to the purchase of this product.
Use smooth pipe when practical
Smooth-wall rigid pipe, such as appropriately rated PVC, usually creates less resistance than sharply ribbed or corrugated discharge hose. Corrugated hose can be useful for temporary setups or flexible connections, but its internal ridges and folds may reduce flow compared with a properly routed smooth pipe.
If you use flexible hose:
Keep it as straight as possible.
Avoid kinks and tight bends.
Secure it so the pump outlet is not carrying the hose’s weight.
Make sure the hose cannot collapse when the pump runs.
For a permanent installation, rigid pipe is often easier to support and protect, provided it is installed according to the pump and plumbing instructions.
Product prices and availability are accurate as of the date/time indicated and are subject to change. Any price and availability information displayed on Amazon.com at the time of purchase will apply to the purchase of this product.
Plan the discharge route, not just the pipe diameter
Pipe size is only one part of the installation. Before cutting pipe, check the entire route from the pump to the outdoor discharge point.
Account for vertical lift
The pump’s published flow rate may be listed at zero lift or at a particular discharge height. Flow normally decreases as the water must be lifted higher. Compare the pump’s performance information with the actual vertical distance from the pump to the outlet.
A long vertical rise may justify using the largest pipe size permitted by the manufacturer and minimizing fittings. If the pump cannot provide adequate flow at the required height, simply installing a larger pipe will not solve the underlying capacity problem.
Minimize unnecessary elbows
Every elbow and fitting adds resistance. Use a gradual route where possible, avoid sharp bends, and support the pipe so it does not sag. Keep the discharge line independent of plumbing that is not approved for sump pump use.
Discharge water away from the foundation
The outdoor outlet should direct water far enough away that it does not run back toward the foundation or re-enter the sump system. Check local requirements for discharge location, backflow protection, buried piping, and connections to storm drainage.
Do not connect a sump pump discharge to a sanitary sewer unless local authorities and the plumbing code specifically allow it. Follow local code and the pump manufacturer’s instructions, especially for below-grade discharge lines and freeze-prone climates.
How to measure an existing discharge line
If you are replacing a pump or repairing an existing system, do not rely on a tape measure across the outside of a threaded fitting alone. Instead:
Unplug the pump before working near the basin.
Identify the pump outlet or the pipe’s nominal size marking.
Check the old check valve for its printed size.
Measure the pipe’s outside diameter only as a cross-check, since nominal pipe sizes do not equal their exact outside measurements.
Compare the result with the new pump’s installation manual.
If the existing pipe is smaller than the new pump’s required outlet, plan for a properly sized adapter or replacement section. Do not force mismatched fittings together or rely on sealant to compensate for the wrong size.
Common setup mistakes
Using the wrong adapter
A threaded pump outlet may require a specific male or female adapter. A fitting that appears to fit but does not engage correctly can leak or damage the pump housing. Use the connection type specified by the manufacturer, and avoid overtightening plastic fittings.
Installing the check valve backward
A backward check valve can stop or severely restrict discharge. Confirm that the arrow points away from the pump and toward the discharge outlet.
Creating a sag in the pipe
A low spot can retain water, add resistance, and increase the amount of water that returns to the basin when the pump stops. Support horizontal runs and maintain a sensible route toward the outlet.
Forgetting the anti-airlock hole
Some sump pump installations require a small air-relief hole in the discharge pipe below the check valve or near the pump outlet. This prevents an airlock that can stop or reduce pumping. The exact location and size depend on the pump instructions, so do not drill one unless the manufacturer directs you to do so.
Discharging too close to the house
Even a correctly sized pipe can contribute to basement moisture if it releases water beside the foundation. Extend or reroute the outlet as needed, while complying with local rules and preventing the line from freezing.
Quick sizing decision
Use this approach when selecting parts:
Read the pump manual and identify the required discharge diameter.
Match the pipe and check valve to that diameter.
Keep the line at that size instead of reducing it downstream.
Use the fewest practical fittings and avoid kinks.
Check the pump’s rated flow at the actual vertical lift.
Confirm that the outdoor outlet sends water away from the foundation.
If the pump outlet, existing pipe, and replacement parts do not match, use a purpose-made adapter or replace the undersized section. When the system has an unusually high lift, a long discharge run, multiple pumps, or a history of basement flooding, have the design reviewed by a qualified plumber or follow the manufacturer’s technical guidance.
When to replace the discharge line
Replace the line if it is cracked, kinked, badly corroded, leaking at joints, clogged with debris, or too small for the replacement pump. A replacement line is also reasonable when the current route repeatedly freezes or sends water back toward the foundation.
If the pipe is correctly sized and unobstructed but the pump still cannot keep up, the problem may be pump capacity, excessive lift, a failing check valve, or an abnormal water inflow—not necessarily the pipe diameter. Do not install a larger pump without confirming that the basin, electrical circuit, check valve, and discharge system can support it.
FAQ
Is 1-1/4-inch or 1-1/2-inch pipe better for a sump pump?
Neither is universally better. Use the diameter specified for the pump outlet. Many residential pumps use one of these sizes, but reducing or adapting the pipe should follow the manufacturer’s instructions and the needs of the discharge route.
Can I use a larger discharge pipe than the sump pump outlet?
A larger pipe may be acceptable with the correct adapter, but it is not automatically beneficial. Confirm the pump manufacturer permits it, and make sure the adapter and fittings do not create a restriction or leak.
Does a sump pump need a check valve?
Many installations benefit from a check valve because it prevents water in the discharge pipe from flowing back into the basin. Select a valve that matches the pipe size and install it in the direction shown by its flow arrow.
Why is my sump pump discharging less water than expected?
Check for a clogged filter or pump inlet, a kinked or undersized hose, a backward or stuck check valve, leaks at fittings, excessive vertical lift, a blocked outlet, or a full basin. If the discharge route is clear and the pump still performs poorly, the pump may need service or replacement.
Can sump pump discharge pipe be reduced in size?
It can be reduced with an appropriate fitting when specifically permitted, but reducing the line may restrict flow and increase pump run time. Keeping the discharge pipe at the pump’s specified diameter is usually the safer choice.