A sump pump should usually have a check valve installed in the discharge pipe. When the pump shuts off, the valve prevents water already lifted into the pipe from flowing back into the sump pit. Without one, the pump may repeatedly lift the same water, causing extra cycling, noise, and wear.
Setup · Mon Sep 07
Should a sump pump have a check valve
A sump pump should usually have a check valve on its discharge pipe. The valve prevents water from flowing back into the pit when the pump shuts off, reducing unnecessary cycling and protecting the pump system.
What a sump pump check valve does
A check valve allows water to flow in only one direction: away from the sump pump and toward the discharge point. It closes when the pump stops.
Without a check valve, water in the vertical discharge pipe can drain back into the basin. The returning water may raise the float or water level enough to restart the pump. This can create a cycle in which the pump turns on, shuts off, and immediately turns on again.
A check valve can help:
- Reduce backflow into the sump pit
- Prevent unnecessary pump cycling
- Limit water hammer and discharge-pipe noise
- Reduce the amount of water the pump must lift repeatedly
- Protect against some discharge-line drainage problems
A check valve does not stop flooding by itself, and it does not replace a properly sized pump, a working backup system, or a discharge line that drains safely away from the foundation.
Replacement check valve
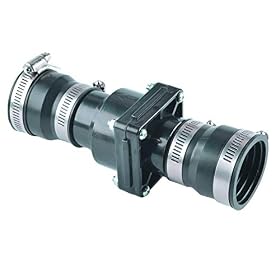 Hydro Master Plastic Sump Pump Check Valve with Stainless Steel Clamps for 1-1/2 inch or…HYDRO MASTER
$15.99 as of
View on Amazon Little Giant CV-10 Check Valve for the following Little Giant Series Condensate Pumps - VCC,…Little Giant
$8.27 as of
View on Amazon Threlaco 2 Pack Sump Pump Check Valve Fit 1-1/2 inch and 1-1/4 inch PipeThrelaco
$22.99 as of
View on Amazon
Product prices and availability are accurate as of the date/time indicated and are subject to change. Any price and availability information displayed on Amazon.com at the time of purchase will apply to the purchase of this product.
Where should the check valve go?
For most submersible sump pump installations, the check valve goes in the discharge pipe above the pump and below the point where the pipe leaves the basin or connects to other discharge plumbing. Follow the pump and valve manufacturer's instructions if they specify a different arrangement.
The valve body normally has an arrow showing the permitted flow direction. That arrow must point away from the pump and toward the discharge outlet. Installing the valve backward can stop or severely restrict discharge flow.
Many installations use a check valve close to the pump, with a union or removable connection nearby. This makes it easier to remove the pump for service. The connection should remain accessible rather than being buried behind permanent construction.
Some systems use more than one pump or connect to a shared discharge line. In those cases, each pump may need its own check valve to prevent water from flowing backward through an inactive pump. Use the equipment manufacturer's layout and local plumbing requirements for multi-pump systems.
Serviceable check valve with union
 Zoeller 30-0151 2-Inch Cast Iron Slip x Slip Check Valve UnionZoeller
$66.75 as of
View on Amazon The Basement Watchdog 2" Quiet Sump Pump Check Valve - Durable PVC w/Rubber Unions -…BASEMENT WATCHDOG
$41.98 as of
View on Amazon Zoeller 1.5" PVC Quiet Union Check Valve (Pack of 1)Zoeller
$43.05 as of
View on Amazon
Product prices and availability are accurate as of the date/time indicated and are subject to change. Any price and availability information displayed on Amazon.com at the time of purchase will apply to the purchase of this product.
Does every sump pump need one?
Most conventional sump pump systems benefit from a check valve, and many manufacturers recommend or require one. However, the exact setup depends on the pump, pipe layout, discharge height, and whether the system uses a shared line or an unusual drainage arrangement.
Check the pump manual before installation. A check valve that is too restrictive, incorrectly sized, or installed in the wrong position can reduce flow. The valve should match the discharge pipe size and be rated for the pump's application.
Do not confuse a sump pump check valve with a foot valve. A foot valve is generally used to keep a suction line primed, while a typical submersible sump pump pushes water through a discharge pipe and uses a check valve to prevent backflow.
How to choose the right check valve
Match the discharge pipe size
Choose a valve designed for the diameter of the pump's discharge pipe. Reducing the pipe size just to fit a valve can increase flow resistance and may reduce the pump's performance.
Confirm the flow direction
Look for a directional arrow or other marking on the valve. The arrow should point toward the discharge outlet.
Consider the valve connection
Check whether the valve uses threaded, slip, barbed, or union-style connections. The connection must match the pipe material and should be assembled according to the fitting and cement manufacturer's instructions. Do not force incompatible fittings together.
Avoid unnecessary restriction
A check valve adds some resistance to the discharge line. Choose a valve intended for sump pump use and avoid an undersized or poorly matched valve. The pump's published flow at the system's total lift is more important than a free-flow rating by itself.
Plan for service
A valve that can be removed or accessed is easier to inspect and replace. If the installation includes a union, make sure there is enough room to disconnect it without cutting the discharge pipe.
Installation and safety considerations
Before working on a sump pump, unplug it from the electrical receptacle. If the system has a battery backup, inverter, or separate pump, disconnect those power sources according to their instructions as well. Keep electrical connections dry, and do not modify grounded wiring or protective devices.
For a typical installation:
- Unplug the pump and confirm it cannot start unexpectedly.
- Measure the discharge pipe and select a compatible valve.
- Check the valve's flow arrow.
- Install the valve in the discharge line using the correct fittings and procedures for the pipe material.
- Support the pipe so the valve and pump outlet are not carrying excessive weight.
- Allow enough room to remove the pump or valve later.
- Restore power and test the system by adding water to the basin slowly.
- Watch for leaks, unusual vibration, slow discharge, or repeated rapid cycling.
Some check valves require a small relief hole or vent hole in a specific location, while others do not. Do not drill one unless the pump or valve instructions call for it. An incorrectly placed hole can spray water inside the basin or reduce system performance.
If cutting, gluing, rewiring, or modifying a permanently installed discharge system is beyond your experience, use a qualified plumber or follow the manufacturer's installation procedure closely.
Troubleshooting a noisy or malfunctioning check valve
The pump runs, but water flows back into the pit
First, confirm that the valve is installed with the flow arrow pointing away from the pump. Then inspect the valve for debris, a damaged flapper, or a loose connection. A valve that does not close fully may need cleaning or replacement.
A small amount of water may still return from the short section of pipe between the valve and the pump. The goal is to prevent the entire discharge column from draining back, not to eliminate every drop of water in the plumbing.
The pump turns on again immediately after shutting off
Check for backflow first. If the discharge pipe drains back into the basin, the returning water may be restarting the float switch. Also check whether the basin is receiving water from a drain tile, downspout, or plumbing source faster than expected.
If the valve is working, inspect the float switch and confirm that the pump is not sitting in a position where the switch can bind against the basin or discharge pipe.
The check valve bangs when the pump stops
A sharp closing sound can come from the valve closing against moving water. Check that the valve is appropriate for the pipe size and pump system, and make sure the discharge pipe is supported. A worn or damaged valve may also slam or chatter.
Some noise can be normal, but loud water hammer, vibration, or pipe movement deserves attention because it can loosen fittings over time.
The pump runs longer or moves less water after installation
A newly installed valve may be the wrong size, installed backward, obstructed, or too restrictive for the system. Turn off power before inspecting it. Also check for a clogged discharge line, a frozen outdoor outlet, or a kinked flexible hose.
Compare the installation with the pump manual rather than removing the valve automatically. Removing a recommended check valve can bring backflow and short-cycling problems.
When should you replace the valve or the pump?
Replace the check valve when it is cracked, stuck open, leaking around its body, repeatedly chattering, or no longer closing after debris is removed. Use a compatible replacement rather than choosing solely by outside diameter or appearance.
A replacement pump may be reasonable when the pump has a failing motor, damaged outlet, severely worn impeller, repeated electrical faults, or inadequate capacity for the required lift. If the pump is otherwise sound and the problem is limited to backflow, a replacement check valve is usually the more targeted repair.
After any repair, test the system with enough water to make the pump cycle several times. Confirm that water leaves the building safely, the valve closes when the pump stops, and the pump does not restart rapidly because of backflow.
FAQ
Can a sump pump work without a check valve?
It can operate, but most sump pump systems should have a check valve to prevent discharge water from flowing back into the basin. Without one, the pump may cycle unnecessarily and experience extra wear.
How close should a check valve be to a sump pump?
It is commonly installed in the discharge pipe above the pump, often fairly close to the pump, but the exact location should follow the pump and valve instructions. Keep the connection accessible for service.
Does a check valve reduce sump pump flow?
A check valve adds some flow resistance. Use one that matches the discharge pipe size and is intended for the pump system. An undersized, backward, clogged, or overly restrictive valve can noticeably reduce discharge performance.
Why does my sump pump make a banging noise when it shuts off?
The check valve may be closing abruptly, the discharge pipe may be unsupported, or the valve may be worn or mismatched. Inspect the flow direction, fittings, pipe support, and valve condition with the pump disconnected from power.