A sump pump must overcome more than the vertical distance from the pit to the discharge outlet. To size one correctly, calculate the total dynamic head (TDH): the vertical lift plus the resistance created by the discharge pipe, check valve, elbows, and other fittings. Then choose a pump that provides enough flow at that head—not merely a high maximum gallons-per-hour (GPH) rating.
Size & Head · Mon Sep 07
How to Size a Sump Pump for Head Height
Sizing a sump pump by horsepower alone can lead to poor performance. Calculate total dynamic head, compare the pump's flow at that height, and account for pipe size, elbows, and discharge layout.
What head height means
Head height is the vertical distance the pump must lift water. Measure from the normal water level in the sump basin to the point where the discharge pipe releases water outside or connects to a drainage system.
For example, if the water level is 2 feet below the floor and the discharge pipe exits 6 feet above the floor, the vertical lift is approximately 8 feet. The exact starting point should follow the pump manufacturer's rating method, but the key measurement is the pump's water level to the discharge point.
Head is usually expressed in feet. A pump rated for a certain flow at 0 feet may move substantially less water at 8 or 10 feet of head.
Replacement valve for reducing backflow
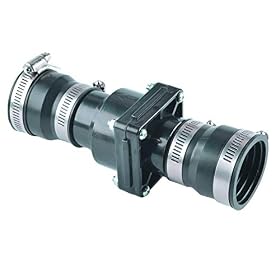 Hydro Master Plastic Sump Pump Check Valve with Stainless Steel Clamps for 1-1/2 inch or…HYDRO MASTER
$15.99 as of
View on Amazon Silent Sump Pump Check Valve, 1-1/2 Inch NPT, Spring-Loaded Flapper, Universal Fit with Hose Clamps,…Delyle
$17.99 as of
View on Amazon Threlaco 2 Pack Sump Pump Check Valve Fit 1-1/2 inch and 1-1/4 inch PipeThrelaco
$22.99 as of
View on Amazon
Product prices and availability are accurate as of the date/time indicated and are subject to change. Any price and availability information displayed on Amazon.com at the time of purchase will apply to the purchase of this product.
Calculate total dynamic head
Use this basic estimate:
Total dynamic head = vertical lift + friction loss in the discharge system
Friction loss comes from the length and diameter of the pipe and from restrictions such as:
- Check valves
- 90-degree elbows
- Horizontal pipe runs
- Tee fittings
- Narrow or mismatched adapters
- Corrugated discharge hose
- Partly closed valves or obstructions
A short, large-diameter, smoothly routed discharge line creates less resistance than a long line with several tight bends. The discharge system can therefore affect pump selection almost as much as the vertical lift.
A simple sizing example
Suppose the vertical lift is 9 feet. After accounting for the pipe run, fittings, and check valve, you estimate another 3 feet of resistance. The pump should be selected for approximately 12 feet of total dynamic head.
That number is an example, not a universal allowance. For a more accurate result, use the friction-loss table supplied by the pump manufacturer or a plumbing reference for the actual pipe diameter, material, length, and fittings.
Discharge components for a lower-resistance setup
- Threlaco 2 Pack Sump Pump Check Valve Fit 1-1/2 inch and 1-1/4 inch PipeThrelaco
$22.99 as of
View on Amazon  Jackel SumpStick - Sump Pump Discharge Kit (Model: JTSS1)Jackel
$24.99 as of
View on Amazon Y-Type Dual Sump Pump Kit, 1-1/2" PVC Backflow Check Valve No GlueGeneric
$48.82 as of
View on Amazon
Product prices and availability are accurate as of the date/time indicated and are subject to change. Any price and availability information displayed on Amazon.com at the time of purchase will apply to the purchase of this product.
Compare pump flow at the calculated head
Look for a performance curve or flow table in the pump documentation. It should show the pump's flow at different head heights.
The important figure is the pump's flow at your estimated TDH. A pump advertised with a large maximum GPH figure may produce much less flow once it lifts water several feet. A pump with a lower free-flow rating can sometimes perform better in a restrictive discharge system.
When comparing pumps, check:
- Flow at your calculated head: This is the primary comparison.
- Maximum shutoff head: The height at which the pump can no longer move water. Your system's TDH must remain below this point.
- Discharge outlet size: Do not automatically reduce the pipe size to match an existing narrow line without checking the manufacturer's instructions.
- Pump curve conditions: Confirm whether the published figures assume a particular pipe size or setup.
- Float-switch clearance: The pump and switch must fit and operate freely in the basin.
Avoid choosing a pump solely by horsepower. Horsepower does not provide a complete picture of flow, head capability, efficiency, or performance in a specific discharge layout.
Power-outage protection
 The Basement Watchdog Combo Preassembled Primary & Battery Backup Sump Pump System w/Monitoring Controller (CITS-50);…BASEMENT WATCHDOG
$469.00 as of
View on Amazon Wayne Preassembled Primary & Battery Backup Sump Pump Combo SystemWayne
$567.41 as of
View on Amazon VEVOR 2500W Sump Pump Battery Backup System, LCD Display, Auto Switches to Battery Inverter Power…VEVOR
$179.20 as of
View on Amazon
Product prices and availability are accurate as of the date/time indicated and are subject to change. Any price and availability information displayed on Amazon.com at the time of purchase will apply to the purchase of this product.
Account for water inflow
Head height tells you how difficult it is to move water. It does not tell you how much water enters the basin during a storm.
The pump must remove water at a rate greater than the expected inflow at the design head. If the basin fills quickly during heavy rain, a pump that barely exceeds normal inflow may still allow the water level to rise.
Consider:
- How quickly the sump fills during heavy rain
- Whether groundwater is seasonal or persistent
- The size and drainage of the foundation area
- Whether downspouts or surface water are contributing to the pit
- Whether the discharge line can safely carry the pump's output
If you cannot estimate inflow precisely, use observations from a heavy storm and allow a practical margin rather than selecting a pump that operates at its limit. A sump-pump professional can help calculate required capacity for homes with unusually high groundwater or flood exposure.
Measure your system before shopping
Record these details:
- Water level in the basin to the discharge outlet: vertical lift
- Total vertical and horizontal pipe length
- Interior pipe diameter
- Number and type of elbows
- Check-valve type and size
- Any adapters, tees, or restrictive sections
- Discharge destination and whether it can accept the flow
If the existing discharge line contains corrugated hose or several sharp bends, improving the discharge layout may increase real-world performance more effectively than simply buying a larger pump. Any plumbing change must remain compatible with the pump outlet and local requirements.
How much safety margin should you use?
Do not size a pump so its rated flow exactly matches the estimated inflow. Real systems vary because of debris, valve wear, voltage conditions, changing groundwater, and uncertainty in friction estimates.
A reasonable approach is to choose a pump that provides useful flow at the calculated TDH while retaining capacity above the expected inflow. The right margin depends on the home's flood risk, basin size, power reliability, and whether a backup pump or battery system is available.
A very oversized pump is not automatically better. It may cycle more often if the basin is small, exceed the capacity of the discharge plumbing, or create unnecessary stress on the check valve and pipe connections. Follow the pump and basin manufacturer's requirements for minimum basin dimensions and switch operation.
Check the check valve and discharge pipe
A check valve prevents water in the discharge pipe from flowing back into the basin after the pump stops. Without one, the pump may cycle repeatedly as the pipe drains back into the pit.
The valve also adds some resistance. Use a valve intended for sump-pump discharge and install it in the orientation specified by its manufacturer. Make sure the pipe is supported so its weight is not hanging from the pump outlet.
Inspect the discharge line for:
- A partially blocked or stuck check valve
- A crushed or kinked hose
- Ice or debris at the outdoor outlet
- Leaking joints that reduce effective discharge
- An outlet positioned where water can return toward the foundation
When to choose a backup system
If flooding would cause serious damage, sizing the primary pump correctly is only part of the plan. Consider a separate backup pump, battery backup, generator-ready arrangement, or a combination suited to your situation.
A backup pump is especially useful when the primary pump is electric and the home is vulnerable to power outages. A backup system should have its own appropriate discharge arrangement or be installed exactly as directed by the manufacturer. Test the backup system periodically and replace batteries according to their maintenance requirements.
Quick sizing checklist
- Measure the vertical lift from the sump water level to the discharge point.
- Estimate friction from pipe length, diameter, elbows, valves, and hose type.
- Add vertical lift and friction to estimate total dynamic head.
- Read the pump curve at that head height.
- Confirm that the pump's flow exceeds expected inflow with a sensible margin.
- Verify outlet size, basin clearance, float-switch movement, and electrical requirements.
- Check that the discharge route can safely handle the flow and direct water away from the foundation.
- Add backup protection if a power outage or pump failure would create unacceptable damage.
If the pump cannot reach the discharge point, runs continuously, or moves very little water despite a clear basin and hose, stop relying on the maximum GPH label. Recalculate TDH, inspect the check valve and discharge line, and compare the pump's performance curve with the actual system. Disconnect power before servicing the pump, and defer electrical repairs or installation changes to a qualified professional when appropriate.
FAQ
Is sump pump head height measured from the bottom of the pit?
Usually, head is considered from the pump's water level or discharge point reference specified by the manufacturer to the final discharge point. Check the pump documentation for its exact rating method. Measuring from the bottom of the basin can overstate or understate the operating head depending on the water level and pump position.
Does a higher horsepower sump pump always handle more head?
No. Horsepower alone does not show how much water a pump will deliver at a particular height. Compare the manufacturer's flow curve or table at your calculated total dynamic head.
How does a check valve affect sump pump sizing?
A check valve prevents water from draining back into the basin, but it adds some flow resistance. Include it when estimating total dynamic head and use a valve sized and installed according to the pump manufacturer's instructions.
Should I use a larger discharge pipe for a sump pump?
A properly sized, smooth discharge pipe can reduce friction, but the correct size depends on the pump outlet, manufacturer instructions, pipe length, fittings, and local requirements. Do not assume that the largest possible pipe is automatically correct, and avoid unnecessary reductions.
What should I do if my sump pump runs continuously?
First check the filter or inlet for debris, the discharge pipe for clogs or ice, the check valve for blockage, and all joints for leaks. Confirm that the pump and float are positioned correctly and that the basin is not receiving more water than the pump can remove. If the pump still cannot keep up, compare its flow at the actual total head with the inflow; a replacement pump, improved discharge line, or backup system may be needed.