A check valve on a sump line prevents discharged water from running back into the pit after the pump shuts off. Install it in the discharge pipe above the pump, with the arrow pointing away from the pump. Before cutting the pipe, unplug the pump, remove standing water from the line if possible, and follow the pump and valve manufacturer’s instructions.
Setup · Mon Sep 07
How to Install a Check Valve on a Sump Line
A check valve keeps water in the discharge pipe from flowing back into the sump pit when the pump stops. Here is how to choose, place, and install one safely.
What a sump pump check valve does
When a sump pump runs, it pushes water up and out through the discharge pipe. When the pump stops, gravity can pull some of that water back toward the pit. The returning water can:
- Make the pump cycle again unnecessarily
- Add extra water to the sump basin
- Cause water hammer or pipe movement
- Increase wear on the pump
- Allow water to drain back into the basement if the discharge line is poorly arranged
A check valve allows flow in one direction only. It does not increase pump capacity or correct an undersized, blocked, or badly routed discharge line.
Serviceable valve connection
 ZOELLER 1-1/2" Check Valve with Union, PVC, Socket Connection TypeZoeller
$45.75 as of
View on Amazon Superior Pump 99555 Universal Check Valve, Plastic, Fits all 1-1/4-Inch or 1-1/2-Inch MIP or FIP,…Superior Pump
Check price on Amazon
View on Amazon Y-Type Dual Sump Pump Kit, 1-1/2" PVC Backflow Check Valve No GlueGeneric
$48.82 as of
View on Amazon
Product prices and availability are accurate as of the date/time indicated and are subject to change. Any price and availability information displayed on Amazon.com at the time of purchase will apply to the purchase of this product.
Choose the right valve before cutting the pipe
Select a valve that matches the discharge pipe size and is rated for sump pump use. The valve’s connections must match the pipe type and joining method, such as solvent-weld PVC connections or threaded connections. Do not assume that a valve with a similar-looking opening will fit your pipe.
Look for these details:
- Pipe size: Match the valve to the pump’s discharge connection and existing pipe.
- Flow direction: Find the molded or printed arrow. It must point away from the pump and toward the discharge outlet.
- Connection type: Confirm whether the valve uses slip, threaded, or another connection.
- Service access: A valve with removable unions or accessible connections is easier to inspect or replace later.
- Pump compatibility: Check the pump instructions for any required valve style or installation position.
A valve that is too restrictive, installed backward, or not compatible with the pipe can reduce flow or prevent the pump from discharging properly.
Materials for rebuilding a cut discharge section
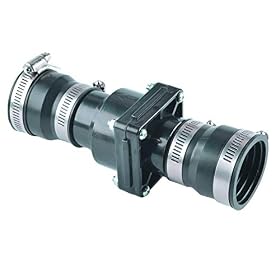 Hydro Master Plastic Sump Pump Check Valve with Stainless Steel Clamps for 1-1/2 inch or…HYDRO MASTER
$15.99 as of
View on Amazon Tellingyou Sump Pump Check Valve Fits 1-1/2 inch or 1-1/4 inch PipeTellingyou
$15.99 as of
View on Amazon The Basement Watchdog 2" Quiet Sump Pump Check Valve - Durable PVC w/Rubber Unions -…BASEMENT WATCHDOG
$41.98 as of
View on Amazon
Product prices and availability are accurate as of the date/time indicated and are subject to change. Any price and availability information displayed on Amazon.com at the time of purchase will apply to the purchase of this product.
Where to install the check valve
Install the valve in the discharge pipe above the sump pump, usually in the vertical section close enough to the pump that it can be accessed for service. Keep the valve accessible rather than burying it behind a finished wall or permanently sealed enclosure.
The exact location depends on the pump, pipe layout, and manufacturer instructions. If the installation includes a backup pump or a shared discharge line, do not place one valve where it can interfere with the other pump. Each pump may require its own properly arranged check valve.
Avoid installing the valve where it will be difficult to support the pipe. The valve adds weight to the line, and unsupported PVC can put stress on the pump discharge fitting.
Tools and materials
The required tools depend on the existing pipe and valve connections. Typical installations may need:
- A compatible sump pump check valve
- Pipe cutter or fine-tooth saw
- Tape measure and marker
- Deburring tool or utility knife
- Replacement pipe and compatible couplings
- PVC primer and cement if using solvent-weld PVC
- Two wrenches for threaded fittings, when applicable
- Pipe supports or clamps if the line needs additional support
- Towel, bucket, and eye protection
Use only joining products approved for the pipe material and follow their labeled cure times. Do not substitute household adhesive for products intended for pressurized plumbing connections.
Step-by-step installation
1. Disconnect power and inspect the existing setup
Unplug the sump pump before working on the discharge line. If the pump is hardwired, turn off the appropriate circuit and have a qualified electrician handle electrical disconnection when necessary. Never work on the pump or wet electrical connections with power available.
Inspect the pipe from the pump to the discharge point. Identify where the valve can be installed while leaving enough straight pipe for secure connections and future service.
2. Measure the valve and mark the pipe
Hold the valve beside the discharge pipe and account for the insertion depth of each connection. Mark the section of pipe that must be removed. Measure carefully; removing too much pipe can leave the discharge line too short to reconnect without additional fittings.
If the valve uses threaded fittings, avoid forcing the pipe or valve into alignment. Excessive side pressure can crack plastic fittings or the pump discharge outlet.
3. Cut and prepare the pipe
Cut the marked section as squarely as possible. Remove burrs and dry-fit the valve and any couplings before applying primer, cement, or thread sealant.
During the dry fit, confirm three things:
- The valve arrow points away from the pump.
- The pipe and valve are aligned without strain.
- The valve can be removed or accessed for future maintenance.
Do not glue the assembly until the orientation and fit are correct.
4. Join the valve to the discharge line
For solvent-weld connections, use the primer and cement specified for the pipe and fitting material. Apply them according to the product instructions, push the pipe fully into the fitting, and hold the joint in position long enough to prevent it from backing out.
For threaded connections, start the threads by hand to avoid cross-threading. Use only the sealant recommended for the fitting and do not overtighten plastic threads. Hold the stationary fitting while tightening so torque is not transferred to the pump outlet.
If the valve has a required installation orientation, follow it. Some valves can be installed vertically or horizontally, while others perform correctly only in a particular position.
5. Support the pipe and allow the joint to cure
Check that the discharge pipe is supported and that the valve is not hanging from the pump outlet. Keep the pipe routed so it does not push sideways on the valve or pump.
For glued joints, wait at least the cure time stated by the cement manufacturer before running the pump. Cool temperatures, damp conditions, larger pipe sizes, and pressurized applications can require additional curing time.
6. Restore power and test the installation
Reconnect power only after the joints are ready and the work area is dry. Add water to the sump basin slowly, or wait for normal inflow, and observe several pump cycles.
Check for:
- Leaks at both valve connections
- Water flowing out through the discharge line
- Unusual banging, vibration, or pipe movement
- A pump that runs longer than before
- Water returning rapidly to the pit after shutdown
- A valve that appears to restrict flow
Do not rely on a single short test. Watch the pump start, discharge, stop, and remain stopped through more than one cycle.
Common installation mistakes
Installing the valve backward
The most common mistake is ignoring the flow arrow. A backward valve blocks discharge flow or severely restricts it. If the pump runs but little water leaves the line, disconnect power and verify the arrow direction before investigating the pump.
Using the wrong pipe size or connection
A valve that does not match the discharge pipe may leak or create a restriction. Adapters can sometimes be used when approved and properly installed, but unnecessary reductions can hurt performance.
Placing the valve where it cannot be serviced
Check valves contain moving parts and can eventually become clogged or fail. Leave access for inspection and replacement. Do not permanently close the valve behind drywall without an access panel.
Failing to support the discharge pipe
A valve can add leverage to the pump outlet. Secure the pipe to nearby framing where appropriate, but do not crush or deform the pipe with tight clamps.
Testing before adhesive has cured
Pressurizing a newly glued joint too soon can cause it to separate. Follow the cement manufacturer’s cure instructions rather than using the pump immediately.
Adding multiple valves without a reason
Extra valves can add resistance and make diagnosis harder. Use the arrangement required by the pump, backup system, and manufacturer instructions. A backup pump connected to the same discharge line may need a specifically designed configuration.
Troubleshooting after installation
The pump runs but water does not discharge
Unplug the pump and check the following in order:
- Confirm the check valve arrow points away from the pump.
- Look for a closed or blocked discharge outlet.
- Check for a clogged pipe, frozen exterior section, or kinked flexible hose.
- Confirm the valve flap or internal mechanism is not jammed with debris.
- Verify that the pump intake and impeller are clear.
If the line is clear and the valve is correctly oriented but discharge remains poor, the valve may be too restrictive, damaged, or incompatible with the pump. Replace it with a properly matched valve if inspection confirms a valve problem.
Water flows back into the pit after the pump stops
A small amount of water may remain in the pipe, but rapid or excessive backflow can indicate a missing, backward, damaged, or debris-blocked check valve. Check the valve’s orientation and inspect its internal flap according to the manufacturer’s instructions.
Also check for leaks around the valve and joints. A leaking joint can look like valve failure while actually allowing water to escape from the discharge line.
The pump short-cycles or makes loud banging noises
A short cycle can result from water returning through the line, a float switch problem, or an overly full basin. Banging may be caused by water hammer, loose pipe, or a valve closing abruptly. Secure the line, inspect the valve, and confirm the float moves freely without contacting the pipe or basin wall.
If the pump continues to start and stop rapidly, disconnect power and investigate the float and discharge system before continued operation. Repeated short-cycling can damage the pump.
The joint leaks
Turn off power and dry the area. Threaded connections may need to be disassembled and resealed with the correct sealant. A solvent-weld joint that was cut, poorly prepared, or assembled incorrectly usually needs to be cut out and replaced rather than patched on the outside.
If the pump outlet or surrounding fittings are cracked, replace the damaged component and avoid stressing the new connection.
When to call a professional
Get qualified help if the pump is hardwired, the circuit or outlet is wet or damaged, the discharge line passes through finished walls, or the installation involves a backup pump, battery system, or complex shared discharge arrangement. Follow local plumbing and electrical requirements, which may specify discharge routing, backflow protection, or electrical protection.
Replace the check valve when it is cracked, stuck, corroded, repeatedly leaking, or no longer stopping significant backflow. Replace the pump or have it evaluated when the pump has poor output with a clear, correctly sized discharge line, makes grinding noises, trips protection, or shows signs of electrical damage.
FAQ
Does a sump pump need a check valve?
A check valve is commonly used to prevent discharged water from flowing back into the sump pit when the pump stops. Follow the pump manufacturer’s instructions and local requirements, especially for backup or shared discharge systems.
Which way should the check valve arrow point?
The arrow should point away from the sump pump and toward the discharge outlet. This is the direction water should flow during pumping.
How close should a check valve be to a sump pump?
Place it in an accessible section of discharge pipe above the pump, following the pump and valve manufacturer’s guidance. Keep the pipe supported and leave enough access to inspect or replace the valve.
Why is my sump pump not pumping after I installed a check valve?
First unplug the pump and verify that the valve is not installed backward. Then check for a clogged discharge line, frozen outlet, stuck valve mechanism, incorrect pipe connection, or a pump intake or impeller blockage.
Can I install a check valve horizontally on a sump line?
Some valves are suitable for horizontal installation and others require a particular orientation. Use only a valve approved for the planned position and follow its installation instructions.