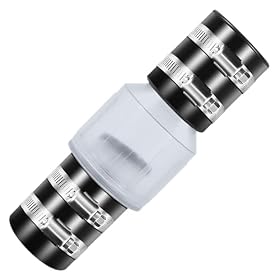
A long uphill discharge requires more than a pump with a high horsepower number. Choose a sump pump based on its flow at your calculated total dynamic head, then account for pipe friction, fittings, check-valve resistance, basin fit, and backup protection.
A high-head sump pump can handle a long uphill discharge, but the correct choice depends on flow at the required head, not the pump’s maximum head or horsepower alone. Calculate the vertical lift from the pump’s normal water level to the discharge point, add resistance from the pipe and fittings, and compare that total with the manufacturer’s performance curve. A pump that looks powerful on its label may move very little water at the height your system requires.
What “head” means in a sump pump system
Head is the resistance the pump must overcome to move water through the discharge system. For an uphill sump discharge, it has two main parts:
Static head: The vertical distance from the pump’s operating water level to the discharge outlet.
Friction head: Resistance created by the length and size of the pipe, elbows, adapters, check valve, and other fittings.
Measure the vertical rise to the point where water leaves the system—not merely to the basement ceiling or the top of the basin. If the discharge line runs horizontally after rising, that horizontal distance still creates friction, but it does not add to the vertical head.
The combined figure is often called total dynamic head (TDH). Use it when reading the pump’s performance chart.
Choose by flow at total head
Sump pumps are commonly advertised with a maximum head or maximum gallons-per-hour figure. Those numbers describe different operating conditions and should not be used alone for sizing:
Maximum head is the approximate height at which the pump can no longer produce useful flow. It is not a practical target for normal operation.
Maximum flow is measured at little or no lift and can be much higher than the real-world flow.
Flow at head tells you how much water the pump can move at a specific lift and system resistance.
Look for a performance curve or table that lists flow at several head heights. Select a pump that still provides the discharge rate you need at your calculated TDH, preferably with some margin rather than operating at the pump’s limit.
If the manufacturer does not publish performance information at the head you need, treat that as a reason to choose a different documented pump or contact the manufacturer. Horsepower by itself is not a reliable substitute for a pump curve.
Product prices and availability are accurate as of the date/time indicated and are subject to change. Any price and availability information displayed on Amazon.com at the time of purchase will apply to the purchase of this product.
How to estimate the required head
Use this practical check before shopping:
Measure the vertical lift. Start at the pump’s normal water level and measure to the discharge outlet.
Record the pipe length and size. A long, narrow discharge line creates more resistance than a shorter, larger line.
Count fittings. Elbows, tees, reducers, adapters, and other changes in direction add resistance.
Include the check valve. Its internal design and size affect flow.
Use a friction-loss chart or the manufacturer’s guidance. Convert the pipe run and fittings into an estimated friction head.
Add static and friction head. Compare the result with the pump’s performance curve.
For an important or frequently flooded basement, avoid relying on a rough estimate alone. A pump manufacturer, plumbing professional, or qualified installer can help calculate the system more accurately, especially when the discharge rises several feet or travels a long distance.
Product prices and availability are accurate as of the date/time indicated and are subject to change. Any price and availability information displayed on Amazon.com at the time of purchase will apply to the purchase of this product.
Pipe size matters more on long runs
A long uphill discharge is often limited as much by the discharge plumbing as by the pump. Smaller pipe produces greater friction, which reduces flow and increases the workload on the pump. Do not automatically reduce the outlet to match an existing smaller line without checking the pump instructions and the effect on performance.
Use the discharge size recommended by the pump manufacturer where practical. Keep the route as direct as possible, limit unnecessary elbows, and avoid sharp restrictions. A larger pipe may reduce friction, but it cannot compensate for a pump that does not produce enough flow at the required head.
The discharge should also be routed so it cannot drain back into the sump area or create a nuisance near the foundation. Follow local plumbing requirements and the pump manufacturer’s installation instructions.
Install the check valve correctly
A check valve prevents water in the discharge line from flowing back into the basin after the pump stops. Without one, the returning water can cause short cycling, repeated starts, and unnecessary wear.
Check these details during installation:
Install the valve in the direction shown by its flow arrow.
Use a valve compatible with the discharge pipe and pump system.
Make sure the valve is accessible for cleaning or replacement.
Leave the manufacturer-specified allowance for drainage holes or anti-airlock provisions, if required by that pump design.
Do not assume every check valve has the same flow resistance.
A noisy valve, reduced flow, or frequent cycling can indicate a stuck, clogged, incorrectly installed, or overly restrictive valve.
Confirm the pump fits the basin and operates reliably
A high-head pump still needs to work correctly in the existing sump basin. Before buying, check:
The pump’s physical dimensions and inlet arrangement
Whether the float can move through its full range without touching the basin, pipes, or cover
The minimum water level needed for the pump to start and stop
The required outlet size and electrical connection
Whether the pump is intended for continuous or intermittent sump service
Whether the basin has enough capacity to limit frequent cycling
A vertical or tethered float may behave differently in a small basin. If the float cannot move freely, the pump may fail to start, run continuously, or turn on and off too often. Never bypass a float switch as a permanent solution.
When a high-head pump is not enough
A single pump may not be the best answer when the discharge point is very high, the pipe run is unusually long, or the basement has a serious flood risk. Consider professional sizing or a different system design if:
The required head is close to the pump’s published maximum.
The pump curve does not show useful flow at your calculated TDH.
The pump runs continuously during normal inflow.
The basin fills faster than the pump can lower it.
The discharge repeatedly freezes or becomes blocked.
A power outage is a realistic flood risk.
For critical protection, a separate backup pump with an independent power source can be more valuable than simply installing a larger primary pump. The backup should be sized for the same discharge conditions, not selected only by its free-flow rating.
Quick buying checklist
Before ordering a high-head sump pump, have these details available:
Vertical lift from normal sump water level to the outlet
Approximate horizontal pipe length
Discharge pipe diameter and material
Number and type of elbows and fittings
Check-valve type and size
Desired flow at the calculated head
Basin dimensions and float clearance
Available electrical supply and backup requirements
The most important comparison is the pump’s documented flow at your total dynamic head. If two pumps have similar maximum flow or horsepower ratings, the one with the stronger performance at your actual head is generally the more suitable choice.
When to replace the pump or the discharge system
Replace the pump when it cannot provide adequate flow at the required head, repeatedly overheats, trips electrical protection, makes unusual grinding noises, or has a damaged cord or housing. Electrical faults, damaged wiring, and water near electrical connections should be handled by a qualified professional.
If the pump is appropriately sized but performance remains poor, inspect the check valve, pipe for blockage, fittings for restrictions, and the discharge outlet for ice or debris. A poorly designed or undersized discharge line may need modification rather than a more powerful pump. Follow the pump instructions and local code before changing pipe size, wiring, or the discharge route.
FAQ
What is the most important specification for a high-head sump pump?
The key specification is flow at the total dynamic head of your installation. Compare the manufacturer’s performance curve at your vertical lift plus pipe and fitting resistance, rather than relying on maximum head, maximum flow, or horsepower alone.
Does horizontal discharge pipe add to sump pump head?
Horizontal pipe does not add vertical elevation, but it does create friction resistance. A long horizontal run, small pipe, elbows, and restrictive valves can substantially reduce flow.
Should I use a larger discharge pipe for a long uphill run?
A larger pipe can reduce friction on a long run, but it must be compatible with the pump and fittings. Follow the manufacturer’s recommended discharge size and calculate the effect of any reducers or adapters.
Do I need a check valve on a high-head sump pump?
A check valve is normally used to prevent water in the discharge line from returning to the basin when the pump stops. Install it in the correct flow direction and choose a properly sized valve with acceptable flow resistance.
When should I add a backup sump pump?
Add backup protection when a power outage, primary-pump failure, or unusually high inflow could cause serious damage. The backup pump and its power source must also be suitable for the system’s actual discharge head.