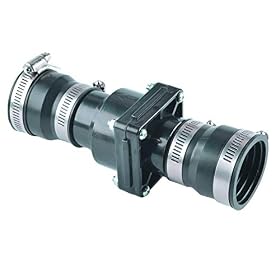
A sump pump check valve prevents discharged water from flowing back into the pit. Choose one that matches your pipe size, pump discharge, flow direction, and installation space.
Check valve for a sump discharge line
A check valve for a sump discharge line prevents water from flowing backward into the sump pit after the pump shuts off. Without one, the pump may cycle unnecessarily, the pit may refill quickly, and the pump can experience extra wear. The correct valve must match the discharge pipe size, allow enough flow for the pump, and be installed in the right direction.
What a sump pump check valve does
A check valve allows water to move in one direction: from the sump pump into the discharge pipe. When the pump stops, the valve closes and holds water in the vertical or horizontal section of pipe above it.
This reduces the amount of water the pump must move each time it starts. It also helps prevent:
Backflow into the sump pit
Rapid pump cycling
Water hammer and pipe movement
Unnecessary pump wear
Some discharge-line noise
A check valve does not replace a properly sized pump, a correctly routed discharge line, or a backup pump system. It is one part of the discharge plumbing.
How to choose the right check valve
Match the pipe diameter
Check the inside diameter or nominal size of the sump discharge pipe. Common residential discharge piping is often 1 1/4 inches or 1 1/2 inches, but you should verify your installation rather than assume the size.
A valve that is too small can restrict flow and increase the pump's workload. A valve that does not fit the pipe will require adapters, which add connections and potential leak points.
Measure the pipe or check the pump and existing plumbing specifications before ordering. Pipe size markings may be printed on the pipe, fittings, or valve body.
Confirm the flow direction
Most check valves have an arrow showing the permitted flow direction. The arrow should point away from the pump and toward the discharge outlet. Installing the valve backward can stop the pump from discharging water and may cause the pump to run continuously.
Choose a valve intended for sump pumps
Look for a valve specifically designed for sump pump discharge or wastewater drainage. A suitable valve should tolerate repeated pump cycling and the expected water conditions. Avoid substituting a valve intended only for a different plumbing application unless its manufacturer specifically permits that use.
Consider the connection type
Sump check valves may use flexible rubber couplings with hose clamps, threaded connections, solvent-weld connections, or a combination of these. Choose a connection style compatible with your existing pipe and the manufacturer's instructions.
Flexible couplings are convenient for replacement and service. Solvent-welded connections can be permanent and neat, but they require compatible pipe and cement. Threaded connections may simplify removal but need careful sealing and alignment.
Account for clearance and service access
Leave enough room to inspect or replace the valve. Do not bury it behind a finished wall or permanently obstructed plumbing if it is the only practical way to service the discharge line.
A short, accessible section of pipe above the pump is often a practical location. Follow the valve and pump instructions for the recommended position and orientation.
Product prices and availability are accurate as of the date/time indicated and are subject to change. Any price and availability information displayed on Amazon.com at the time of purchase will apply to the purchase of this product.
Where to install the valve
The valve is normally installed in the discharge pipe above the sump pump. The exact location depends on the pump design and plumbing layout, so follow the manufacturer's instructions.
Before installation, make sure:
The pump is unplugged.
The sump pit and surrounding floor are dry enough to work safely.
The discharge pipe is supported so the valve does not carry excessive weight.
The valve arrow points away from the pump.
The valve is accessible for inspection.
The discharge line still has a suitable route to the exterior or approved drain point.
Do not rely on the check valve to hold up unsupported pipe. Add appropriate pipe support where needed, and avoid putting side loads on the pump outlet.
Product prices and availability are accurate as of the date/time indicated and are subject to change. Any price and availability information displayed on Amazon.com at the time of purchase will apply to the purchase of this product.
Basic replacement procedure
The safe procedure varies by plumbing material and valve design, but the general process is:
Disconnect power to the sump pump. Do not work on the pump while it can start automatically.
Identify the existing valve and mark the direction of flow.
Support the discharge pipe before cutting or loosening any connection.
Remove the old valve and inspect the pipe ends for cracks, deformation, or buildup.
Install the replacement valve with its arrow pointing away from the pump.
Tighten clamps or fittings according to the valve instructions. Do not overtighten plastic fittings.
Make sure the pipe is aligned and supported without forcing the valve sideways.
Allow solvent-welded joints to cure for the time specified by the cement manufacturer.
Restore power and add water to the pit gradually to verify operation.
Check every connection for leaks while the pump runs and after it shuts off.
If the installation involves unfamiliar electrical wiring, a permanently hardwired pump, or plumbing that cannot be safely isolated, consult a qualified professional.
Product prices and availability are accurate as of the date/time indicated and are subject to change. Any price and availability information displayed on Amazon.com at the time of purchase will apply to the purchase of this product.
Troubleshooting a sump check valve
Water flows back into the pit after the pump stops
A small amount of water may drain back from the pipe, but a large or sudden return can indicate a failed, obstructed, incorrectly installed, or poorly sealed check valve.
Check that:
The valve arrow points away from the pump.
The valve is the correct size for the pipe.
The valve flap or internal mechanism is not blocked by debris.
The valve is not cracked.
Connections around the valve are not leaking.
If cleaning does not restore proper operation, replacement is usually more practical than attempting to repair the valve.
The pump runs but discharges little water
First inspect the filter or inlet screen on the pump if the pump has one, then check the discharge hose or pipe for a clog, kink, frozen section, or crushed area. Verify that the check valve is not installed backward or stuck closed.
Also inspect the discharge outlet for blockage and confirm that the pipe has not separated underground or outside the building. If the pump still has poor output with a clear line and correctly installed valve, the pump itself may be worn or undersized.
The valve leaks at a connection
Turn off power and inspect the joint. A loose clamp, damaged rubber coupling, misaligned pipe, cracked fitting, or incompatible sealant can cause leakage. Replace damaged couplings or fittings rather than continuing to tighten them.
Water leaking from the valve body itself usually means the valve should be replaced.
The system makes a loud bang when the pump stops
The noise may come from water hammer, pipe movement, or a check valve that closes abruptly. Secure loose pipe, confirm that the valve is installed in the correct orientation, and check whether the valve manufacturer provides a quieter or slow-closing design for sump applications.
Some clicking or tapping is normal with certain valve designs. Persistent banging that moves the pipe or stresses fittings should be corrected.
The pump cycles too often
Backflow through a missing or failed check valve is one possible cause. Other causes include a high inflow rate, a float switch set incorrectly, a leaking discharge line, or a pit that is too small for the conditions.
Watch the water level after the pump stops. If it rapidly returns to the activation level and the discharge line is not receiving new water, inspect the check valve and discharge plumbing.
When to replace the valve or the pump
Replace the check valve when it is cracked, stuck, excessively noisy, leaking through the body, or allowing substantial backflow after cleaning and correct installation. Use a replacement that matches the pipe size and pump application.
The pump may need replacement when it cannot produce normal flow despite a clear discharge line and properly functioning valve, when it trips electrical protection, overheats, or shows damaged wiring. Never handle damaged electrical components while the pump is energized. Follow the pump manufacturer's instructions or use a qualified professional.
A check valve is not a substitute for backup protection. If a flooded basement would cause serious damage, consider a properly installed backup pump, an alarm, and a reliable discharge arrangement in addition to the primary pump.
FAQ
Does every sump pump need a check valve?
Most sump pump discharge systems benefit from a check valve because it limits water flowing back into the pit after shutdown. Follow the pump manufacturer's instructions and account for the specific pipe layout.
What size check valve do I need for a sump pump?
Choose a valve that matches the nominal diameter of the discharge pipe and is approved for the pump application. Common residential sizes include 1 1/4 inches and 1 1/2 inches, but measure or verify your existing plumbing before buying.
Which way does a sump pump check valve go?
The arrow on the valve body should point away from the sump pump and toward the discharge outlet. Reverse installation can prevent the pump from moving water.
Can a sump pump check valve be installed horizontally?
Some check valves can operate horizontally, while others require a particular orientation. Check the product instructions before installing one horizontally, and keep the valve accessible for service.
How often should a sump pump check valve be replaced?
There is no universal replacement interval. Inspect it when servicing the pump and replace it if it leaks, sticks, cracks, becomes excessively noisy, or allows significant backflow.