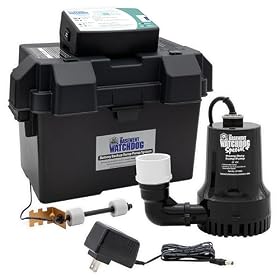
A backup sump pump may not kick in because its battery is discharged, the float cannot move, the pump is clogged, or the system is not configured to start automatically. Follow these checks in order before replacing the pump.
A backup sump pump that is not kicking in usually has a problem with its power source, float switch, discharge path, or installation setup. Start by checking the battery and the float, then inspect the pump, hose, check valve, and basin. Do not wait for the next storm to find out whether the backup works.
Safety first
Before reaching into the basin or touching wiring:
Disconnect power to the primary and backup pumps when the manufacturer’s instructions call for it.
Keep electrical connections dry and do not handle plugs or controls while standing in water.
Do not bypass a fuse, alarm, battery safety feature, or circuit protection.
If the pump is hardwired, the outlet is damaged, or wiring is wet, have a qualified electrician or plumber inspect it.
A backup system may use a battery-powered pump, a water-powered pump, or a separate pump connected to the same basin. The checks below apply generally, but the installation manual takes priority.
1. Check whether the backup is supposed to start automatically
Some backup pumps start only when the water reaches a separate float or sensor. They will not run merely because the primary pump is unplugged. Other systems require a control panel to detect a power failure or a high-water condition.
Confirm that:
The backup pump is installed low enough for its float or sensor to detect rising water.
The float has room to rise without touching the basin, primary pump, discharge pipe, or cords.
The backup control panel is switched on.
Any test or alarm switch is in its normal operating position.
The primary pump is not removing water before the backup reaches its activation level.
If the backup pump has a manual test button, use it only as described in the manual. A control-panel test may check the alarm or battery without running the pump itself.
Product prices and availability are accurate as of the date/time indicated and are subject to change. Any price and availability information displayed on Amazon.com at the time of purchase will apply to the purchase of this product.
2. Inspect the battery and charger
For a battery-backed pump, a weak or disconnected battery is one of the most common causes of failure. Look at the control panel for a low-battery, charging, or fault indication.
Check that:
The battery cables are attached to the correct terminals and are tight.
The battery case is not cracked, swollen, leaking, or unusually hot.
The charger is plugged into a working outlet.
The outlet is not controlled by a wall switch.
The charger’s indicator shows normal charging.
The battery is the type and size specified by the backup system manufacturer.
Do not substitute an automotive battery unless the manufacturer specifically permits it. Some backup systems require a deep-cycle battery or a particular battery chemistry. If the battery is old, will not hold a charge, or fails the system’s built-in test, replacement is usually more practical than repeatedly recharging it.
A battery can show voltage and still collapse under load. If the battery appears charged but the pump will not run, follow the manufacturer’s battery test procedure or have the battery and charger checked.
Product prices and availability are accurate as of the date/time indicated and are subject to change. Any price and availability information displayed on Amazon.com at the time of purchase will apply to the purchase of this product.
3. Make sure the float or sensor can move
Turn off the pump system as directed, then look into the basin with a flashlight. Remove sticks, gravel, mud, insulation, or other debris that could block the backup float.
The float should move freely through its full travel. Check for:
A float trapped under a discharge pipe
A cord caught around the float
A float rubbing against the basin wall
A tethered float positioned incorrectly
A sensor covered with dirt or residue
A pump installed at an angle that prevents normal float movement
Do not force a sealed electronic sensor or open a control panel unless the instructions specifically allow it. If the float switch is cracked, waterlogged, or intermittently responsive, replace the compatible switch or have the system serviced.
Product prices and availability are accurate as of the date/time indicated and are subject to change. Any price and availability information displayed on Amazon.com at the time of purchase will apply to the purchase of this product.
4. Check the backup pump intake and discharge hose
A clogged intake can stop the backup pump from moving water or make it appear inactive. With power disconnected as appropriate, inspect the pump’s inlet screen and remove accessible debris.
Then follow the backup discharge line from the pump to its outlet. Look for:
A kinked or flattened hose
Ice in an exterior discharge line
A blocked outlet
A hose that has pulled loose
A discharge line that rises higher than the pump can handle
A shared discharge pipe that is restricted
The backup pump may run but fail to remove water if the discharge path is blocked. Never operate a pump against a closed valve or blocked discharge unless the manufacturer specifically permits that setup.
Product prices and availability are accurate as of the date/time indicated and are subject to change. Any price and availability information displayed on Amazon.com at the time of purchase will apply to the purchase of this product.
5. Inspect the check valve and pipe connections
A check valve prevents discharged water from flowing back into the basin. If it is installed backward, stuck, clogged, or leaking badly, the backup pump may cycle repeatedly or fail to keep the water level down.
Check that:
The arrow on the valve points away from the pump.
The valve is not packed with debris.
Pipe joints are secure and not pulling apart.
The valve is not installed where it interferes with the float.
Water is not visibly draining back into the basin after the pump stops.
A check valve that allows substantial backflow may need replacement. Use a valve compatible with the pipe size and pump installation, and follow the pump maker’s instructions for its location.
6. Verify the water level and system setup
A backup pump will not start if the water never reaches its activation point. Pouring water into the basin can be a useful test, but only if the pump, discharge line, electrical connections, and controls are installed safely and the manufacturer permits a manual test.
During a controlled test:
Confirm the battery is connected and the backup control panel is on.
Stop adding water if the pump does not start or the level approaches the basin’s safe limit.
If the primary pump starts first and removes all the water, temporarily follow the manufacturer’s test procedure for simulating a backup condition. Do not leave the primary pump disabled during a storm or unattended.
For water-powered backup pumps, confirm that the required municipal water supply is available and that the supply valve is open. These systems generally will not operate from a private well system during a power outage unless the well system itself remains powered.
7. Check the pump motor and control panel last
If the battery, charger, float, intake, discharge line, check valve, and setup are correct, the pump or control system may have failed.
Possible signs include:
No sound or movement during a valid test
A repeated fault alarm
A tripped circuit breaker or blown fuse
A burning smell, melted connector, or damaged cord
The motor humming without pumping
The pump starting briefly and stopping
Do not repeatedly reset a breaker or run a humming pump. A locked impeller, failed motor, damaged relay, or wiring fault can create a shock or fire hazard. Contact the manufacturer, a qualified plumber, or an electrician depending on whether the problem is hydraulic or electrical.
When to replace a part or the backup pump
Replace the battery when it is damaged, cannot hold a charge, or fails the specified test. Replace a float switch, check valve, hose, or control component when it is visibly damaged or cannot be made reliable after cleaning and correct adjustment.
A complete backup pump replacement is reasonable when the motor has failed, the pump has been submerged or overheated, compatible replacement parts are unavailable, or the system is too old to support dependable service. Match the replacement to the basin, discharge plumbing, activation method, and backup power source. A higher-rated pump is not automatically a better choice if the existing pipe cannot handle the flow or the pump cannot reach the required discharge height.
After any repair, test the system under the conditions it is designed to handle. Confirm that the alarm works, the battery charges, the float moves freely, and water is discharged away from the foundation. If the backup is the only protection for a finished basement or flood-prone area, consider professional inspection before the next major storm.
FAQ
Why is my backup sump pump not turning on when the primary pump is unplugged?
Unplugging the primary pump may not raise the water level enough to activate the backup float. Check the backup’s test procedure, battery, control panel, and float position. Do not leave the primary pump disabled after testing.
How do I know whether the backup sump pump battery is bad?
Check the control panel for a low-battery or charging fault, confirm the terminals are connected correctly, and follow the manufacturer’s battery test procedure. A battery that appears charged but fails under load may need replacement.
Can a clogged discharge pipe stop a backup sump pump from working?
Yes. A kinked hose, blocked outlet, frozen pipe, or obstructed check valve can prevent the pump from moving water. The pump may run without lowering the basin level, or it may cycle and trigger an alarm.
How often should I test a backup sump pump?
Follow the manufacturer’s schedule, and test the float, alarm, battery condition, and discharge flow before seasons with heavy rain or snowmelt. Replace or service any component that does not operate consistently during testing.